Troubleshooting switches on splitkb.com DIY kits
Troubleshooting
Common troubleshooting steps for all kits
Troubleshooting RGB LEDs
Having an issue with RGB? Here are the steps to fix it.
When to use
You should use this document when you're using and/or experiencing the following.
Products
This page applies to the following products:
- Any DIY kit where you have to solder the switches, or where you have to solder sockets to mount switches into.
- Any MX or Kailh Choc low profile switch used with the kit.
Situations
Use this page when:
- Pressing a single key does not output anything when pressed.
- Pressing a single key outputs multiple keys of its row or column.
- Pressing any key in a row or column does not output anything when pressed.
Expected outcome
After following the instructions on this page:
- All keys perform only their configured action when pressed.
When to avoid
Do not use this page when:
- Your kit came presoldered.
- Warranty may apply to your product. Please contact us instead.
- If you are confident, you may of course attempt a repair yourself. Please do discuss this with support beforehand.
Your kit may include hot swap sockets, or your kit may require for you to solder the switches to the PCB directly. The steps to troubleshoot one or more switches which don't work as expected is very similar in both cases. Let's get started!
Sanity checks
In the heat of the moment, it's easy to forget some of the basics. There's a lot to it, after all!
Switch function
Not every switch causes output by itself, which can be hard to spot. Of course, pressing an alpha key such as "A" will output the letter a, but if you press a modifier such as Control or Shift, it won't show as output in a text editor. Similarly, keys mapped to locks such as Caps Lock can stay hidden.
Especially sneaky keys are layer keys: pressing them won't communicate anything back to your computer, but will simply change the active layer on your keyboard. If your keyboard has a display, it will usually display the layer state on it. If not, try holding the offending key while pressing some other keys. If their output is now different, then the key you were holding is probably a layer key, and thus works correctly. Whew!
You can check what your keys are mapped to using Vial or by reading the source firmware files used for compiling your keymap. The keymap is usually contained in a file named keymap.c for QMK, and <keyboard>.keymap for ZMK.
Firmware
In case of the Aurora Series keyboards, it can be confusing to see which firmware you need. You can use our Firmware Finder to find the appropriate firmware for your keyboard.
If many switches output different characters than you'd expect, and some other switches don't work altogether despite your soldering looking fine, then it's likely you haven't flashed the Aurora version of the firmware to your keyboard. When compiling your own firmware, look for the Aurora version:
- For QMK and Vial, find your keyboard in the
keyboards/splitkbfolder. - For ZMK, when using the User Config Setup Script, select your Aurora keyboard starting with "splitkb.com Aurora". For example, instead of choosing the "Corne", you'd need to choose the "splitkb.com Aurora Corne".
While following the build guide, we recommend to get a default firmware using our Firmware Finder. Then, after you've verified everything works as expected, you can start to customise your firmware, knowing that the hardware works as it should. This will take a lot of guesswork out of your journey. Nice!
Soldering basics
First, check whether you've soldered the switch or its socket. It can be easy to forget to solder the required joints.
Before soldering, unplug your keyboard. To do so, unplug the USB cable first, and unplug the TRRS cable last.
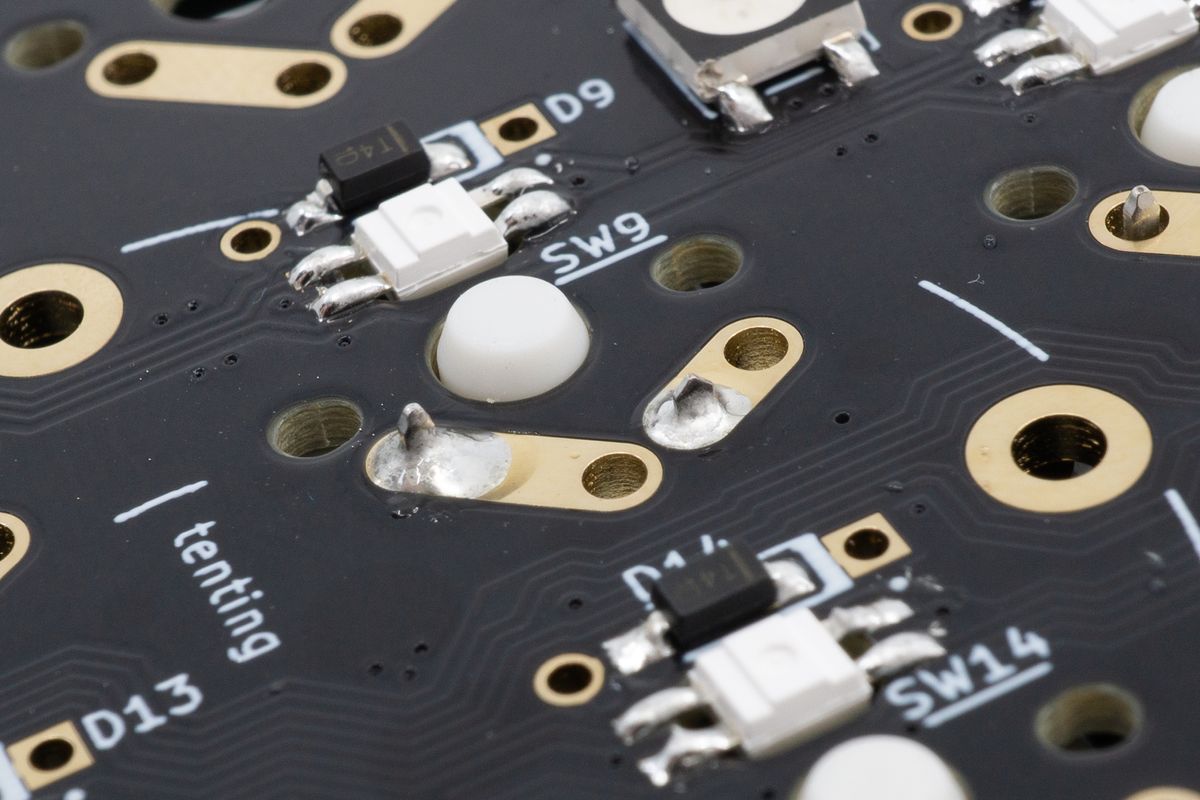
Soldered switch legs.
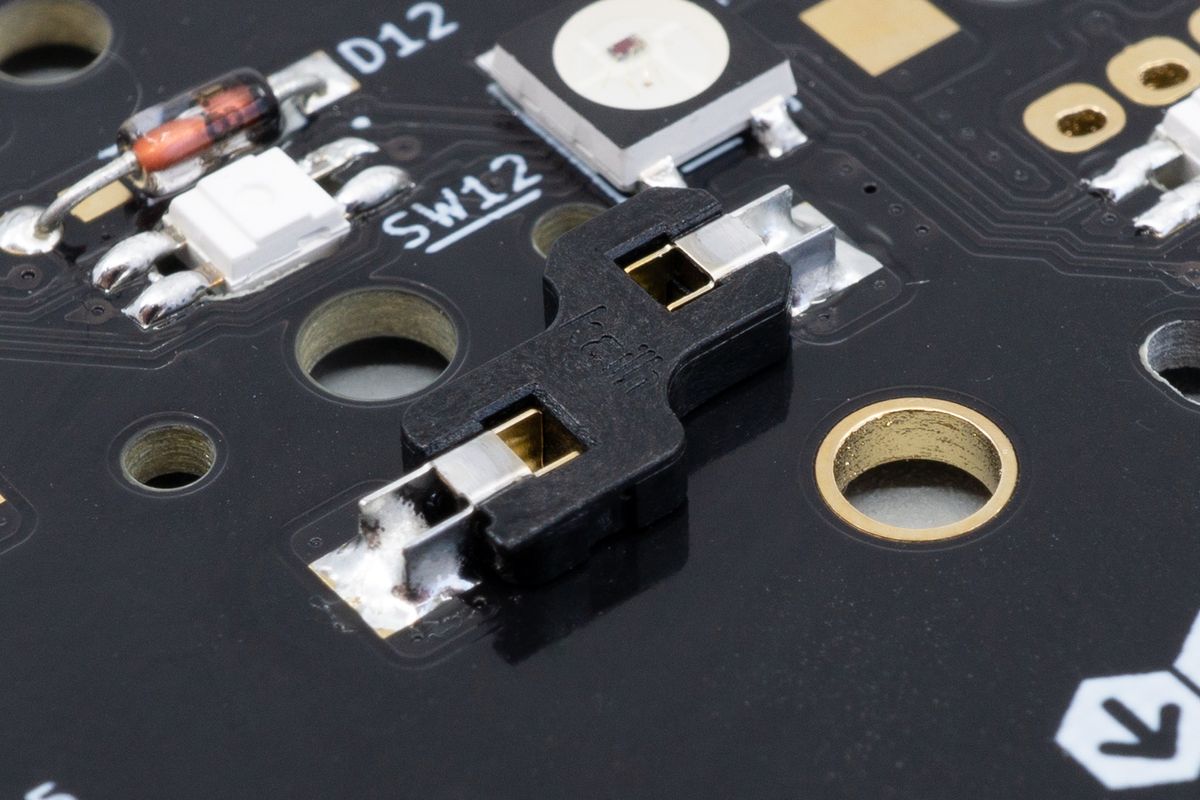
A soldered switch socket. Your socket may look different.
Then, check whether you installed a diode for every switch. While you're at it, also check whether the polarity of the diode is correct. The line on the diode should be facing toward the thick white line.
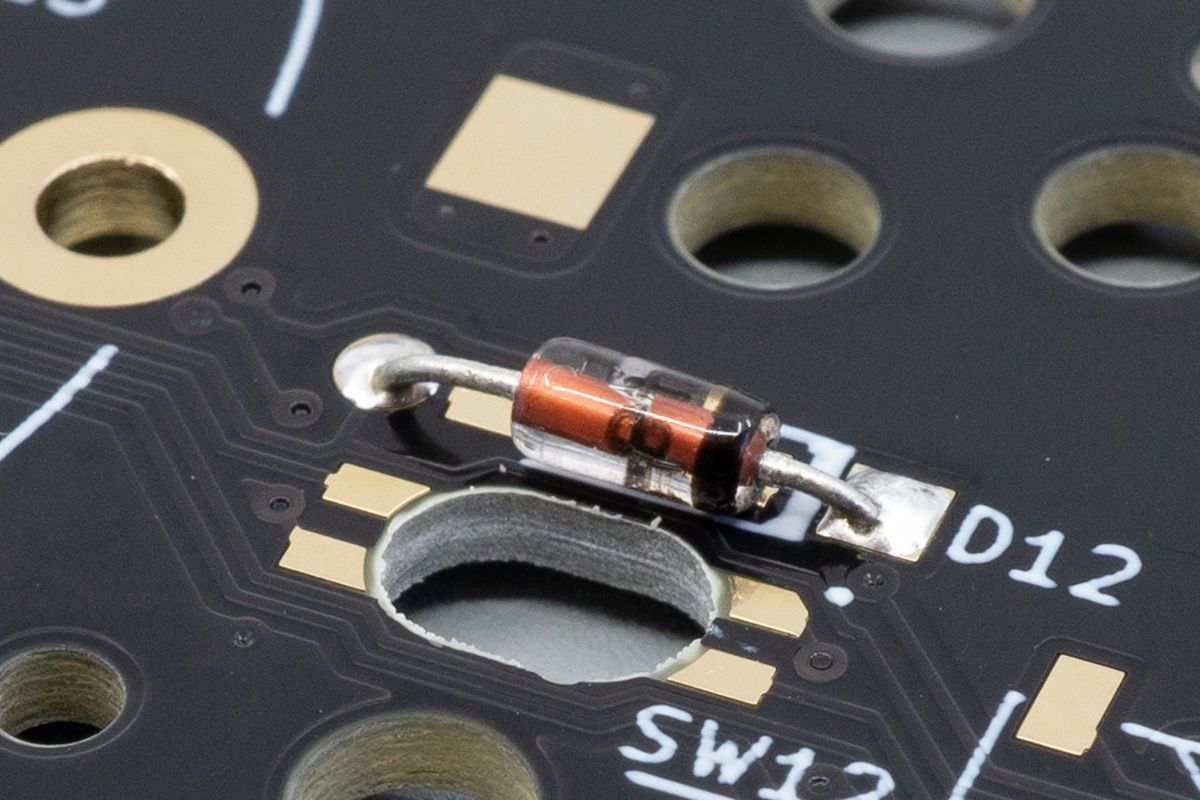
For through-hole diodes, the thick black line on the diode should face toward the thick white line on the PCB.
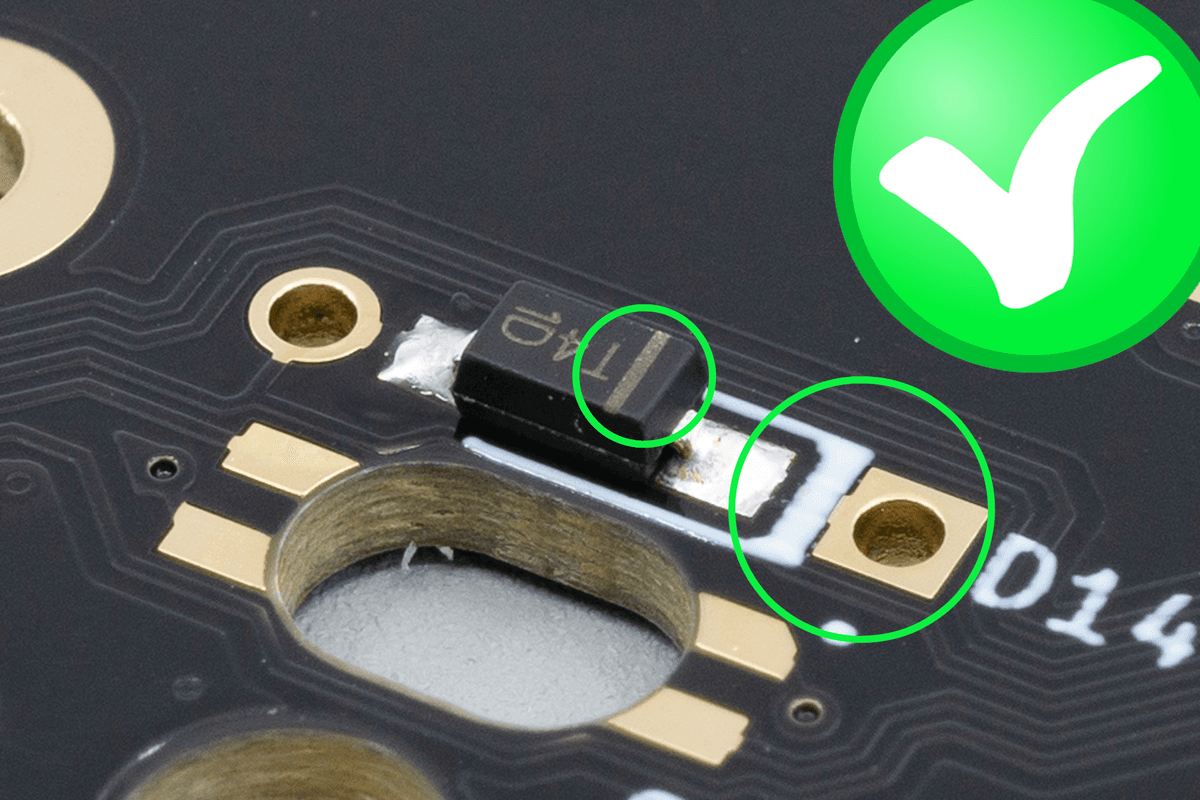
For SMD diodes, the white line on the diode should face toward the thick white line on the PCB.
Joint quality
One or more pads might have a joint that's not up to spec. Compare your work to the joints in the diagram below.
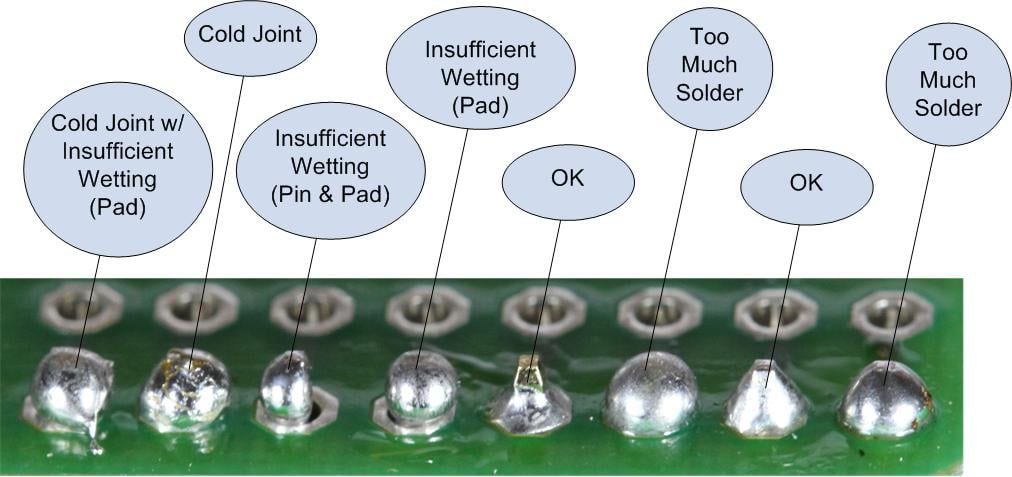
A few example joints. The good joints look like a little volcano.
To fix your joint:
- Be sure to apply the soldering iron to both the pad and the pin at the same time. This allows them both to heat up, which gives the solder a better chance to adhere properly.
- You may need to add solder to the joint. Just a little bit can already do a lot!
- You may need to remove solder from the joint. Using a tool such as a solder sucker or desoldering braid will help you here. Both are affordable tools, and are useful to have in your toolkit.
- When reworking a joint, it can help to use flux. However, most solder already has a flux core, so in a pinch you can apply a bit of extra solder and you may find that the joint will flow more easily.
- Be sure to apply enough heat. Don't be afraid to increase the temperature of your soldering iron. The ideal temperature depends on the iron itself, the kind of solder you're using as well as the size of the joints you're soldering, but you're generally safe to adjust it up to 350ºC or 660 °F.
- At the same time, do not apply heat for too long. You'll only need to touch the joint for a few seconds.
- And do not apply pressure to the joint. Especially when working at high temperatures, applying excess pressure can slide the copper away from the substrate, causing a so-called "lifted pad". You of course do need to press onto the pad and pin so that they can heat up, but there's no need to apply pressure beyond making sure the tip of the iron comes into contact with the pad and pin.
It's a good idea to check all of your joints. In particular for switches, you'll want to check:
- The pads of the switches or the pads of the switch sockets;
- The pads of the diodes;
- The pads of the microcontroller, both on the bottom (of the microcontroller sockets or headers) as well as those on the microcontroller itself (of the microcontroller pins or header pins).
Even if a switch works fine, if the joint doesn't look good then it may cease working in the future. Especially cold joints are prone to erratic behaviour over time. When in doubt, rework the joint so that it looks like a little volcano.
Bridges
In soldering, it is called a "bridge" when two adjacent pads are connected together by solder when they should not be connected. This usually happens by accident, when you've applied too much solder to a joint.
The two large golden pads only have very little space between them, which can make it prone to bridges. No two adjacent pads should be connected.
Bridges can be spotted easily, as they're caused by solder. Look at the pads of your PCB, and check whether any of them are connected to an adjacent pad.
Here, too, check the following pads for bridges, same as earlier:
- The pads of the switches or the pads of the switch sockets;
- The pads of the diodes;
- The pads of the microcontroller, both on the bottom (of the microcontroller sockets or headers) as well as those on the microcontroller itself (of the microcontroller pins or header pins).
If you spot a bridge, fixing it takes the same steps as those outlined earlier in the Joint quality section. Usually, it's enough to simply heat up one or both of the affected pads - surface tension will pull the excess solder back onto the pad, and out of the accidental bridge.
Specific troubleshooting
By now, you've performed the basic quality control steps: all the joints are now soldered and well-formed, and all bridges are now removed.
Usually, the steps above fix most problems. You can plug your keyboard back into your computer and test it. If the switch now works properly, you're good to go! If not, let's move on with more specific steps to remedy the problem.
In this section, you'll find steps for the following situations:
- A single switch does not work as expected
- An entire row or column does not output anything
- Pressing any key in a row or column outputs multiple characters
A single switch does not work as expected
When a single switch doesn't output anything, or if a single switch outputs multiple characters when you were only expecting one:
Check whether the diode is still intact. For a through-hole diode (a glass body with a metal leg on both sides), check if there aren't any cracks in the glass. These cracks should be visible with the naked eye: you won't need a magnifying glass for this. For SMD diodes, which are plastic, check if the housing hasn't molten.
If you can spot any visual damage, replace the diode. To do so, heat up one of the pads, wiggle the diode up a little bit and repeat this, alternating between the pads. It may take a few tries to remove the diode. The key is to not apply much force, and to allow the joint to cool while still pulling the diode upward. Wiggling it up like this prevents the pads from lifting away from the PCB.
If the switch still doesn't work, replace the switch. It's unlikely for a switch to be defective, but it does happen from time to time.
Modding your switches may increase the likelihood of damaging them. The good news: if you know how to mod your switches, you'll probably also know how to repair them 😌
In rare cases, the switch socket may have been damaged, causing its metal contacts to not form a reliable connection. If replacing the switch didn't work, you can try to replace the switch socket as well. Similar to desoldering a diode, heat up one of the pads, wiggle the socket up a little bit and repeat this, alternating between the pads. It may take a few tries to remove the socket. The key is to not apply much force, and to allow the joint to cool while still pulling the socket upward. Wiggling it up like this prevents the pads from lifting away from the PCB.
An entire row or column does not output anything
If none of the switches on a row or column outputs any character, the culprit is likely a bad joint on the microcontroller. Follow the steps in the Joint quality section section to remedy the issue.
If a row or column doesn't work, it's likely that its corresponding pin isn't connected properly. On our kits, row pins are marked with an R followed by the number of the row, such as R0, R1, R2 and so on. The same goes for columns, which are marked with a C such as C0, C1, C2 and so forth.
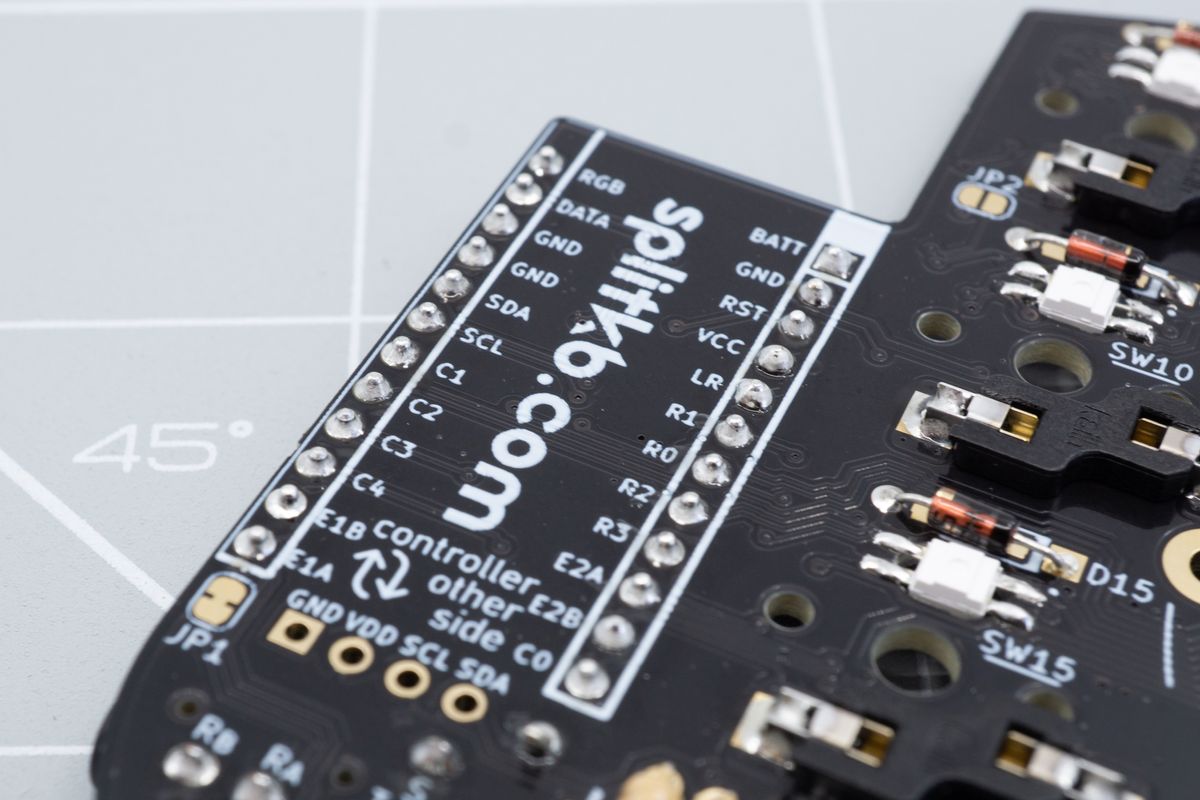
The assignments of the controller pins are marked on the bottom of the PCB, right next to the controller pins.
It's possible that the top and bottom joints on the controller are not connected. This can be the case when using socket pins or diode legs in combination with controller sockets: when a pin isn't inserted fully into the socket, it may not make contact, even though the joints look good.
If the switch still doesn't work after fixing the joints and if you've socketed it, you may remove the controller from its sockets. Then, look at the controller's legs from the side, and verify that they're all the same length.
If one (or more) of the legs are shorter than the others, you may want to remove those and solder them again. It's usually helpful to use a solder pump or desoldering braid to clean up the pad, so you can get a fresh start to try again.
Pressing any key in a row or column outputs multiple characters
The likely culprits here are either a bridge between two or more controller pins, or one or more defective diodes.
First, check whether the diodes are all still intact. For a through-hole diode (a glass body with a metal leg on both sides), check if there aren't any cracks in the glass. These cracks should be visible with the naked eye: you won't need a magnifying glass for this. For SMD diodes, which are plastic, check if the housing hasn't molten.
If you can spot any visual damage, replace the diode. To do so, heat up one of the pads, wiggle the diode up a little bit and repeat this, alternating between the pads. It may take a few tries to remove the diode. The key is to not apply much force, and to allow the joint to cool while still pulling the diode upward. Wiggling it up like this prevents the pads from lifting away from the PCB.
Test the keyboard to see if that remedied the issue.
If not, then one by one, replace the switches. It's unlikely for a switch to be defective, but it does happen from time to time. In this case, a switch leaf can be bent too much, causing it to permanently make contact and thus always be "on". When pressing another key in the same row or column, this then may cause your keyboard to output more than the expected key.
In rare cases, the switch socket may have been damaged, causing its metal contacts to not form a reliable connection. If replacing the switch didn't work, you can try to replace the switch socket as well. Similar to desoldering a diode, heat up one of the pads, wiggle the socket up a little bit and repeat this, alternating between the pads. It may take a few tries to remove the socket. The key is to not apply much force, and to allow the joint to cool while still pulling the socket upward. Wiggling it up like this prevents the pads from lifting away from the PCB.
In rare cases, you might have accidentally formed a bridge between two adjacent diodes. Check whether any two diodes accidentally connect with each other, and if they do, remove the excess solder and test the keyboard again.
No output after following the steps
You have followed all of the relevant steps on this page, and yet your switch still won't output what you expect it to. At this point you know your solder joints are good, your diodes are all oriented correctly, and you've probably even tried to replace the affected switch or switches.
What's left are the traces and perhaps the sockets. If you end up here, there's likely visible damage on your PCB: you may see exposed copper traces (which can look golden or brown, instead of the usually black PCB colour), or you may see lifted pads (exposing the white-green-ish glass fiber material underneath).
There's no need to fret yet: a circuit board is just a collection of conveniently placed wires, and if such a wire is broken, it can be replaced with any common wire.
To diagnose and solve the problem, you'll need:
- A multimeter. Any multimeter will do as long as it has a continuity mode. It's nice if the multimeter can emit a sound when it detects continuity. If you don't own a multimeter yet, this kind of multimeter is among the cheapest and won't have to cost more than €20. An example is the UNI-T UT133B.
- Some cable. Non-stranded, relatively thin cable will work best, but any cable will do as long as it's conductive. If you don't have a cable to use or sacrifice, a snipped off diode leg can work in a pinch - just be sure to isolate the parts that shouldn't be touching pads with tape, or you'll risk shorting other pads.
- Schematics. You can find the schematics for your keyboard in the Product Guides section.
Next up, you'll want to poke at your PCB with the multimeter to ensure that the right pads connect with one another. In particular to switches, we're interested in these pads:
- The connection between the top side of the controller and the bottom, specifically the row and column pads. They're labelled with a letter and a number, such as
R0andR1for rows, andC0andC1for columns. Per pin, if the connection between the top and bottom side of the controller isn't present, you should reflow both joints. If it's still not present then, the socket pin might not have been pressed into the socket far enough. - The connection between the column or row pad of the controller footprint on the keyboard PCB, and all switch pins in the matching column or row. On Aurora Series keyboards, usually the column pins are connected to all switch pins within a column, but other kits may connect the rows instead. You can check the schematics to verify it for your kit.
- The connection between the switch pin not connected to a row or column, and the circular pad of diode. When pressing a switch, it makes contact between both switch pins. A signal passes through one of the pins, then through a diode and back to the controller. One of the switch pins connects to column or row pin, while the other switch pin should connect to the circular pad of the diode.
- The connection between the square pad of the diode, and the row or column pad of the controller footprint on the keyboard PCB. On Aurora Series keyboards, usually the row pins are connected to all square pads of the diodes within a row, but other kits may connect the columns instead. You can check the schematics to verify it for your kit.
If any of the connections is severed (and thus won't give a signal on the multimeter), then it needs to be replaced. You can solder a wire between the two pads you tested for to reinstate the connection. This wire is also lovingly referred to as a "bodge wire".
If the connections do work, but the row or column still do not, then it's likely that the pin on your controller is defective. It's not necessary to replace the entire controller: the pin can be remapped instead. You can look at the Remapping pins guide to see how that would work.
After going through the checks and repairing any severed connections, you should now have a fully working keyboard. If that is still not the case, or if you need advice on any step along the way, please feel welcome to send us an email. It is helpful to send along pictures of your soldering, so we can help you troubleshoot more quickly.
Troubleshooting
Common troubleshooting steps for all kits
Troubleshooting RGB LEDs
Having an issue with RGB? Here are the steps to fix it.